本文将对MongoDB的shardCollection命令进行系统的源码解读并分析几个在运营过程中遇到的问题。决定写这篇文章的原因是在运营过程中,发现一个用户集群创建分片表执行shardCollection命令时,命令执行了几十秒然后返回超时。在不了解代码原理的情况下,光凭日志等现象很难处理发生的异常问题。本文的目的就在于帮助自己和所有和MongoDB分片表打交道的伙伴们,了解其内核细节,更好地处理解决分片表相关问题,如果能对用户使用分片表带来一定的启发,那就更加超乎本文预期了。MongoDB各个版本实现shardCollection的方式都是类似的,本文分析源码的版本是4.0.3版本。
在阅读源码之前,MongoDB shardCollection就像一个黑盒子,让人很难窥其内貌,在运营过程中遇到的很多问题都难以抓住关键点。本文以“shardCollection超时问题”为入口,探讨下面4个核心问题:
(1)mongos收到命令后,执行流程是怎样的?
(2)对已存在的表进行分片有什么限制?
(3)如何设置初始chunk数量来减少balance?
(4)分片路由信息如何存储的?
一、有哪几个阶段?
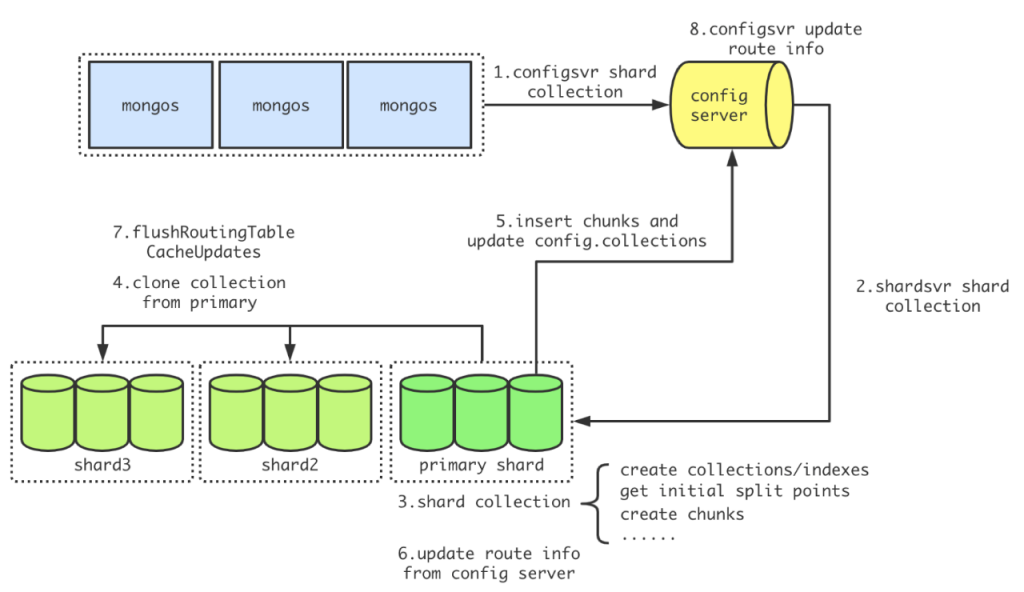
下图是一张shardCollection命令的分阶段流程图,执行该命令的流程和执行其他大多数命令都不相同。mongos不做任何操作,直接转发给config server来执行,config server进行必要的检查,然后把具体的创建动作下发给该db的primary shard来执行,其他分片从primary shard复制参数创建collection和索引,最后从config server获取路由版本信息来更新。
这里回答了问题(1),shardCollection命令执行依次经过mongos、config server、主分片和其他分片几个模块,不同于普通命令从mongos下发到分片执行。执行命令超时不太可能发生在mongos模块中,因为mongos不做任何操作直接转发。config server中会做参数检查,主分片和其他分片要做具体的shard操作,在不同的条件下(比如服务高负载),都有可能花费比较多的时间。下一节将结合源码对config server、主分片和其他分片上的过程进行分析。
二、在哪一个阶段超时
- config server侧的检查工作
- 主分片创建分片表
- 其他分片clone collection
2.1 config server侧的检查工作
2.1.1 请求参数检查
mongos接收到shardCollection命令后没有进行参数检查,把这些基本工作都放在了config server中。请求参数的检查主要包括以下4个方面:
- read concern设置本地读
在mongodb中每个操作都有一个对应的operation context,operation context中存储了该操作的请求参数和各种设置,比如read concern和write concern都是存储在其中。config server中的操作是configsvrShardCollectionCmd,该操作首先会设置操作的read concern为local方式,即本地读。目的是在尽快得读取到config server中最新的写入数据,不必等待数据复制到其他从库,比如shardCollection过程中会多次读取的config.collections和config.chunks两张表。
- write concern是否设置majority
跟路由有关的写入操作的write concern都是majority方式,目的是保证可靠性。试想一下,如果不是写majority,如果写主成功返回后,在从节点复制这条oplog之前发生了切主,就会出现歧义,还可能造成数据丢失。
- db是否开启分片能力
创建分片表前,必须保证db已经开启了分片能力。开启的shell命令是:db.adminCommand( {enableSharding: “数据库名”} )
- 关键请求参数检查
请求参数检查主要检查三类:分片键、集合名以及chunk数量。分片键的检查包括分片键是否指定、hash分片键是否是唯一索引两类。如果集合不为空,指定的分片键必须是已经创建好的索引;如果集合为空但指定的分片键不存在,会自动创建该分片键对应的索引。另外,如果指定的分片键是hash方式,则不能指定该字段为唯一索引,原因在于不同的分片键值计算hash值时可能相同,这可能导致部分新文档插入失败,并提示”duplicate key error”。
集合名不能够是除”system.sessions”之外的系统库,也不能是views。固定集合也不能够进行shard。对于单个集合的chunk数量,MongoDB设置了最大值限制,初始化的时候,单个分片的chunk数量不能够大于8192个,全部分片的chunk总数量不能够大于100w个。这样做的目的是避免太多的chunks使用过多的内存,从而导致进程OOM。此外,请求参数检查还会进行校正器相关的设置。
2.1.2 获取分布式锁
在执行shardCollection之前,configsvrShardCollectionCmd操作会先获取两把分布式锁:db级别分布式锁和表级别分布式锁。MongoDB设计了ReplSetDistLockManager类和DistLockCatalog类来管理锁对象,关于MongoDB锁设计的部分,本文不详述,有兴趣的可以关注作者的后续文章。如果集群同时创建多个分片表或者已有分片表频繁发生chunks的分裂和迁移,可能在获取分布式锁时等待较久,因为config server可能频繁发生修改路由元数据的操作。
2.1.3 下发主分片
真正的shardCollection会被config server下发给该db的主分片来执行,代码如下:
// 设置请求参数,主要设置分片键、是否唯一索引和初始chunk数量
ShardsvrShardCollection shardsvrShardCollectionRequest;
...
// 发送给主分片执行shardsvrShardCollection命令
auto cmdResponse =uassertStatusOK(primaryShard>runCommandWithFixedRetryAttempts(opCtx,ReadPreferenceSetting(ReadPreference::PrimaryOnly),"admin",CommandHelpers::appendMajorityWriteConcern(CommandHelpers::appendPassthroughFields(cmdObj, shardsvrShardCollectionRequest.toBSON())), Shard::RetryPolicy::kIdempotent));

// 4.0版本的主分片都支持ShardsvrShardCollection命令,始终都走第一个分支的逻辑,进行返回参数判断并更新路由版本信息
if (cmdResponse.commandStatus != ErrorCodes::CommandNotFound) {
   uassertStatusOK(cmdResponse.commandStatus);
  ...
   // 更新并获取路由版本信息,如果返回的chunk manager不为空,说明创建分片表成功
   auto routingInfo = uassertStatusOK(catalogCache->getCollectionRoutingInfoWithRefresh(opCtx, nss));
   uassert(ErrorCodes::ConflictingOperationInProgress, "Collection was successfully written as sharded but got dropped before it ", "could be evenly distributed", routingInfo.cm());

   return true;
} else {
...
}
超时问题中没有设置tags,对zone加锁不会耗时太多。发送给主分片时,主要设置分片键、是否唯一索引和初始chunk数量等参数。主分片完成shardCollection命令返回后,config server会调用getCollectionRoutingInfoWithRefresh命令来判断shardCollection是否执行成功并更新本地的路由信息,成功返回true,失败则抛出异常。
2.2 主分片上的shardCollection
主分片上的shardCollection会进行一些基本检查,比如是否是分片集群等。之后会获取该集合上的排它锁,MongoDB定义了一个CollectionCriticalSection对象来管理集合级别的排它锁,该类型对象有两种模式:排它写和排它读。在进行创建集合等任务时,该对象禁止其他的写入操作,当进入真正的shardCollection阶段前会调用enterCommitPhase来禁止任何其他的读写。CollectionCriticalSection对象的用法有点事务操作的风格,代码如下:
       // Take the collection critical section so that no writes can happen.
       CollectionCriticalSection critSec(opCtx, nss);
  ...

       // 禁止该集合任何读写操作
       critSec.enterCommitPhase();
  ...

       // The initial chunks are distributed evenly across shards if the initial split points were
       // specified in the request by mapReduce or if we are using a hashed shard key. Otherwise,
       // all the initial chunks are placed on the primary shard.
       const bool fromMapReduce = bool(request.getInitialSplitPoints());
       const int numContiguousChunksPerShard = initialSplitPoints.empty()
           ? 1
          : (finalSplitPoints.size() + 1) / (initialSplitPoints.size() + 1);

       // Step 6. Actually shard the collection.
       shardCollection(opCtx,
                       nss,
                       uuid,
                       shardKeyPattern,
                       *request.getCollation(),
                       request.getUnique(),
                       finalSplitPoints,
                       tags,
                       fromMapReduce,
                       ShardingState::get(opCtx)->shardId(),
                       numContiguousChunksPerShard);
2.2.1 准备阶段
在CollectionCriticalSection对象调用enterCommitPhase之前为shardCollection的准备阶段,该阶段包括如下几个步骤:
- 创建集合及分片键
- 处理tags信息
- 获取uuid
- 计算初始分割点
创建集合及分片键调用createCollectionOrValidateExisting函数,参数包括了集合名和分片键的相关信息,对已存在表的shard操作的检查也主要在这个函数中。其中重点检查了如下3类场景:
- 除”_id”索引之外的唯一索引必须以分片键作为前缀
- 如果集合非空,集合中必须具有能作为分片键的索引,该索引受如下条件限制:以该分片键作为前缀;不能是空间索引、部分索引和具有复杂校正器的索引;不能有null值;不能是多键;具有默认种子的哈希索引
- 如果分片键设置成唯一索引,则必须存在和指定分片键相等的可用唯一索引
此外,如果集合非空而且找不到可用的索引,流程会失败。但如果是空集合且能够创建出指定的分片键的索引,则会主动创建该索引,并继续shardCollection流程。
void createCollectionOrValidateExisting(OperationContext* opCtx,
                                       const NamespaceString& nss,
                                       const BSONObj& proposedKey,
                                       const ShardKeyPattern& shardKeyPattern,
                                       const ShardsvrShardCollection& request) {
   DBDirectClient localClient(opCtx);
   std::list<BSONObj> indexes = localClient.getIndexSpecs(nss.ns());

   // 1. 除_id之外的唯一索引必须以分片键索引作为前缀
   for (const auto& idx : indexes) {
       BSONObj currentKey = idx["key"].embeddedObject();
       bool isUnique = idx["unique"].trueValue();
       uassert(ErrorCodes::InvalidOptions,
               str::stream() << "can't shard collection '" << nss.ns() << "' with unique index on "
                             << currentKey
                             << " and proposed shard key "
                             << proposedKey
                             << ". Uniqueness can't be maintained unless shard key is a prefix",
               !isUnique || shardKeyPattern.isUniqueIndexCompatible(currentKey));
  }

   // 2. 检查是否有可用索引
   bool hasUsefulIndexForKey = false;
   for (const auto& idx : indexes) {
       BSONObj currentKey = idx["key"].embeddedObject();
       // Check 2.i. and 2.ii.
       if (!idx["sparse"].trueValue() && idx["filter"].eoo() && idx["collation"].eoo() &&
           proposedKey.isPrefixOf(currentKey, SimpleBSONElementComparator::kInstance)) {
       // 哈希索引必须指定seed
           uassert(ErrorCodes::InvalidOptions,
                   str::stream() << "can't shard collection " << nss.ns()
                                 << " with hashed shard key "
                                 << proposedKey
                                 << " because the hashed index uses a non-default seed of "
                                 << idx["seed"].numberInt(),
                   !shardKeyPattern.isHashedPattern() || idx["seed"].eoo() ||
                       idx["seed"].numberInt() == BSONElementHasher::DEFAULT_HASH_SEED);
           hasUsefulIndexForKey = true;
      }
  }

   // 3. 指定唯一索引的分片键必须完全匹配
   if (hasUsefulIndexForKey && request.getUnique()) {
      ...
       BSONObj eqQueryResult;
       for (const auto& idx : indexes) {
           if (SimpleBSONObjComparator::kInstance.evaluate(idx["key"].embeddedObject() ==proposedKey)) {
               eqQueryResult = idx;
               break;
          }
      }

       if (eqQueryResult.isEmpty()) {
           // If no exact match, index not useful, but still possible to create one later
           hasUsefulIndexForKey = false;
      } else {
           bool isExplicitlyUnique = eqQueryResult["unique"].trueValue();
           BSONObj currKey = eqQueryResult["key"].embeddedObject();
           bool isCurrentID = str::equals(currKey.firstElementFieldName(), "_id");
           uassert(ErrorCodes::InvalidOptions,
                   str::stream() << "can't shard collection " << nss.ns() << ", " << proposedKey
                                 << " index not unique, and unique index explicitly specified",
                   isExplicitlyUnique || isCurrentID);
      }
  }

   if (hasUsefulIndexForKey) {
       // 检查null和多键
      ...
       BSONObj res;
       auto success = localClient.runCommand("admin", checkShardingIndexCmd.obj(), res);
       uassert(ErrorCodes::OperationFailed, res["errmsg"].str(), success);
  } else if (localClient.count(nss.ns()) != 0) {
       // 4. 非空集合没有可用索引,失败返回
       uasserted(ErrorCodes::InvalidOptions,
                 "Please create an index that starts with the proposed shard key before "
                 "sharding the collection");
  } else {
       // 5. 空集合创建分片键索引
      ...
       auto createIndexesCmd =
           makeCreateIndexesCmd(nss, proposedKey, collation, request.getUnique());

       BSONObj res;
       localClient.runCommand(nss.db().toString(), createIndexesCmd, res);
       uassertStatusOK(getStatusFromCommandResult(res));
  ...
  }
只有在集合为空且需要创建分片键索引时,createCollectionOrValidateExisting不显示创建collection,而是通过指定”kAllowImplicitCollectionCreation”来隐式创建。
然后开始处理tags信息,本文不做tags做深入的介绍,有兴趣的可以关注后续有关tags的文章。MongoDB使用uuid来唯一标识一个集合,主分片上通过UUID::gen()函数来生成唯一的uuid,在其他分片上则必须使用从主分片传递过来的该集合的uuid。
void InitialSplitPolicy::calculateHashedSplitPointsForEmptyCollection(
   const ShardKeyPattern& shardKeyPattern,
   bool isEmpty,
   int numShards,
   int numInitialChunks,
   std::vector<BSONObj>* initialSplitPoints,
   std::vector<BSONObj>* finalSplitPoints) {
  ...
   const long long intervalSize = (std::numeric_limits<long long>::max() / numInitialChunks)* 2;
   long long current = 0;

   const auto proposedKey(shardKeyPattern.getKeyPattern().toBSON());

   if (numInitialChunks % 2 == 0) {
       finalSplitPoints->push_back(BSON(proposedKey.firstElementFieldName() << current));
       current += intervalSize;
  } else {
       current += intervalSize / 2;
  }

   for (int i = 0; i < (numInitialChunks - 1) / 2; i++) {
       finalSplitPoints->push_back(BSON(proposedKey.firstElementFieldName() << current));
       finalSplitPoints->push_back(BSON(proposedKey.firstElementFieldName() << -current));
       current += intervalSize;
  }

   // 排序
   sort(finalSplitPoints->begin(),
        finalSplitPoints->end(),
        SimpleBSONObjComparator::kInstance.makeLessThan());

   // The initial splits define the "big chunks" that we will subdivide later.
   int lastIndex = -1;
   for (int i = 1; i < numShards; i++) {
       if (lastIndex < (i * numInitialChunks) / numShards - 1) {
           lastIndex = (i * numInitialChunks) / numShards - 1;
           initialSplitPoints->push_back(finalSplitPoints->at(lastIndex));
      }
  }
}
函数最终会返回两个数组:initialSplitPoints和finalSplitPoints。假设集合test没有指定默认chunks数量,集群有5个分片,则计算出来的initialSplitPoints和finalSplitPoints数组如下图所示,-4、-3到4是范围的一个抽象区分,不代表具体的计算数值,可见,initialSplitPoints记录分割的5个大区间的边界值,为[-3,-1,1,3],而finalSplitPoints记录分割的10个小区间的边界值,为[-4,-3,-2,-1,0,1,2,3,4]:
2.2.2 shard collection
准备阶段完成后,CollectionCriticalSection对象会调用enterCommitPhase,阻塞该集合上的读写操作,进行真正的shardCollection工作。
shardCollection会先计算一个值numContiguousChunksPerShard,表示每个分片的连续chunks块数,其计算方式如下,上面例子numContiguousChunksPerShard等于(9+1)/(4+1)=chunks数/分片数=2。
CollectionCriticalSection对象调用enterCommitPhase之后,开始进行真正的shardCollection操作,主要包括以下5个关键步骤:
- 前置检查
- 生成初始chunks
- clone集合到其他分片
- 写分片集合元数据
- 刷新路由
shardCollection前置检查主要是通过在config server上调用count命令来检查config.chunks表中是否具有该分片集合的数据,如果返回不为0,则说明存在同名集合或者同名集合的残留数据,这会导致此次shardCollection失败。如果时残留的同名集合的话,可以清除该集合残留数据后,重新发起shardCollection命令再次对该集合执行shardCollection。
随后开始生成初始的chunks,首先对传入的finalSplitPoints进行排序,并初始化chunks分布的分片shard id集合。这里需要说明两点:一是如果传入的分割点集合和tags都为空,则二次去主分片上获取分割点集合,因为shardCollection在主分片Not Found的情况下会在config server上进行;二是对于范围分片,初始chunks全部在主分片上,分割点集合为空。
有了初始的分割点集合,调用generateShardCollectionInitialChunks命令来生成初始chunks。生成chunk对象需要指定分片键的区间范围[min,max)和chunk所在的shard id,生成chunk对象为ChunkType类型,如下所示。初始分布时,每个分片拥有1个或者多个相邻区间的chunk对象。
   ChunkVersion version(1, 0, OID::gen());
   const auto& keyPattern(shardKeyPattern.getKeyPattern());

   std::vector<ChunkType> chunks;

   for (size_t i = 0; i <= splitPoints.size(); i++) {
       const BSONObj min = (i == 0) ? keyPattern.globalMin() : splitPoints[i - 1];
       const BSONObj max = (i < splitPoints.size()) ? splitPoints[i] : keyPattern.globalMax();

       // It's possible there are no split points or fewer split points than total number of
       // shards, and we need to be sure that at least one chunk is placed on the primary shard
       const ShardId shardId = (i == 0 && splitPoints.size() + 1 < allShardIds.size())
           ? databasePrimaryShardId
          : allShardIds[(i / numContiguousChunksPerShard) % allShardIds.size()];

       appendChunk(nss, min, max, &version, validAfter, shardId, &chunks);
  }
// ChunkType
Expected config server config.chunks collection format:
{
   _id : "test.foo-a_MinKey",
   ns : "test.foo",
   min : {
       "a" : { "$minKey" : 1 }
  },
   max : {
       "a" : { "$maxKey" : 1 }
  },
   shard : "test-rs1",
   lastmod : Timestamp(1, 0),
   lastmodEpoch : ObjectId("587fc60cef168288439ad6ed"),
   jumbo : false              // optional field
}
void InitialSplitPolicy::writeFirstChunksToConfig(
   OperationContext* opCtx, const InitialSplitPolicy::ShardCollectionConfig& initialChunks) {
   for (const auto& chunk : initialChunks.chunks) {
       uassertStatusOK(Grid::get(opCtx)->catalogClient()->insertConfigDocument(
           opCtx,
           ChunkType::ConfigNS,
           chunk.toConfigBSON(),
           ShardingCatalogClient::kMajorityWriteConcern));
  }
}
写入config.chunks表成功之后,主分片继续执行updateShardingCatalogEntryForCollection来更新config server中的config.collection表。更新操作采用upsert方式,失败则直接退出shardCollection流程,不进行清理操作。在下次重新发起之前,必须先进行drop操作。
{
       CollectionType coll;
       coll.setNs(nss);
       if (uuid)
           coll.setUUID(*uuid);
       coll.setEpoch(initialChunks.collVersion().epoch());
       coll.setUpdatedAt(Date_t::fromMillisSinceEpoch(initialChunks.collVersion().toLong()));
       coll.setKeyPattern(fieldsAndOrder.toBSON());
       coll.setDefaultCollation(defaultCollator ? defaultCollator->getSpec().toBSON() :BSONObj());
       coll.setUnique(unique);

       uassertStatusOK(ShardingCatalogClientImpl::updateShardingCatalogEntryForCollection(
           opCtx, nss, coll, true /*upsert*/));
}
更新config server的config库的chunks和config.collections表后,主分片开始更新本地路由信息。该操作使用catalogCache对象从config server获取最新路由,根据返回的结果分为以下4种情况处理:
| 返回结果 | 处理方式 |
|---|---|
| cm为空 | 判定该集合不是分片集合,设置集合非分片并返回 |
| cm中路由版本比本地路由版本低或者相等 | 本地路由版本较新,返回本地路由版本号;反之,需要进一步判断 |
| cm中路由版本比本地实时路由版本低或者相等 | 本地实时路由版本较新,返回本地实时路由版本号 |
| cm中路由版本较高 | 更新本地路由版本和元数据,并返回更新后的路由版本号 |
本地路由版本和本地实时路由版本都是从该集合分片状态拉取的路由元数据,来源相同,不同的是本地路由版本的获取只对集合加共享锁,而本地实时路由版本是加排它锁。本地路由版本可以看成路由检查先遣队,对路由不需要更新的场景做优化,减少集合排它锁的获取次数。
cm即chunk manager,该对象维护了一个ns到chunk info的map,chunk info保存具体的路由,比如分片键的区间范围。在各分片路由信息中,还有另外一个map,其维护了ns到shard version的信息。
主分片更新完成本分片的本地更新信息之后,会对每个chunk所在的分片调用一次_flushRoutingTableCacheUpdates来更新其他分片上的路由信息,已经更新过的则不重复调用。
std::vector<ShardId> shardsRefreshed;
   for (const auto& chunk : initialChunks.chunks) {
       if ((chunk.getShard() == dbPrimaryShardId) ||
           std::find(shardsRefreshed.begin(), shardsRefreshed.end(), chunk.getShard()) !=
               shardsRefreshed.end()) {
           continue;
      }

       auto shard = uassertStatusOK(shardRegistry->getShard(opCtx, chunk.getShard()));
       auto refreshCmdResponse = uassertStatusOK(shard->runCommandWithFixedRetryAttempts(
           opCtx,
           ReadPreferenceSetting{ReadPreference::PrimaryOnly},
           "admin",
           BSON("_flushRoutingTableCacheUpdates" << nss.ns()),
           Seconds{30},
           Shard::RetryPolicy::kIdempotent));

       uassertStatusOK(refreshCmdResponse.commandStatus);
       shardsRefreshed.emplace_back(chunk.getShard());
  }
其他分片在执行_flushRoutingTableCacheUpdates命令时,先进行一些基本的检查,比如不能以read only模式调用。接着设置CriticalSectionSignal,这里必须和主分片保持一致,保证读己之写的因果一致性。接下来会检查请求参数是否设置从config server更新路由,如果设置了的话,则调用forceShardFilteringMetadataRefresh来更新路由信息。分片中对每个集合保存一个任务队列来存储更新路由信息的任务,这里将一直等待直到该集合的更新任务全部完成。最后设置最后一次操作的时间戳。
   oss.waitForMigrationCriticalSectionSignal(opCtx);

   // 如果需要从config server获取路由来更新
   if (request().getSyncFromConfig()) {
               LOG(1) << "Forcing remote routing table refresh for " << ns();
               forceShardFilteringMetadataRefresh(opCtx, ns());
  }

   CatalogCacheLoader::get(opCtx).waitForCollectionFlush(opCtx, ns());

   repl::ReplClientInfo::forClient(opCtx->getClient()).setLastOpToSystemLastOpTime(opCtx);
更新完全部chunks对应分片上的路由信息之后,主分片上的shardCollection操作就完成了。至此,该集合在config server具有了最新的chunks信息和该集合的路由信息,每个分片也都具有该集合的最新路由信息。
对超时问题的日志来看,_flushRoutingTableCacheUpdates操作是耗时最多的地方,其中进行该集合创建在config库下的cache.chunk.nss的索引耗时最长:
个人构建的测试集群在大量insert的情况下也是这部分耗时最长,唯一的区别在于索引创建完成后刷新本地chunks路由信息时耗时也较长。通过日志可以看到刷新本地路由时,出现了大量的remove操作来删除chunks中非本地的区间范围,而且remove是一个空删除,比如如下一条日志,个人理解这是二次保证,能够有效避免脏路由。不过假使集群该分片的负载比较高,这些remove操作也是比较耗时的。
2.3 其它分片的cloneCollection
前面的2.2节提到,主分片发送cloneCollectionOptionsFromPrimaryShard命令给其他分片,来生成集合、创建索引和更新路由。本节来具体看一看cloneCollectionOptionsFromPrimaryShard命令具体包含哪些操作。该命令调用MigrationDestinationManager的cloneCollectionIndexesAndOptions操作来实现集合分片数据拷贝。该操作首先调用listIndexes和listCollections来获取主分片上该集合的索引信息和集合参数信息,并记录_id的索引信息和集合的option和uuid信息。
std::vector<BSONObj> donorIndexSpecs;
   BSONObj donorIdIndexSpec;
   BSONObj donorOptions;
  {
       // 0. Get the collection indexes and options from the donor shard.
      ...
       // Get indexes by calling listIndexes against the donor.
       auto indexes = uassertStatusOK(fromShard->runExhaustiveCursorCommand(
           opCtx,
           ReadPreferenceSetting(ReadPreference::PrimaryOnly),
           nss.db().toString(),
           BSON("listIndexes" << nss.coll().toString()),
           Milliseconds(-1)));

       for (auto&& spec : indexes.docs) {
           donorIndexSpecs.push_back(spec);
           if (auto indexNameElem = spec[IndexDescriptor::kIndexNameFieldName]) {
               if (indexNameElem.type() == BSONType::String &&
                   indexNameElem.valueStringData() == "_id_"_sd) {
                   donorIdIndexSpec = spec;
              }
          }
      }

       // Get collection options by calling listCollections against the donor.
       auto infosRes = uassertStatusOK(fromShard->runExhaustiveCursorCommand(
           opCtx,
           ReadPreferenceSetting(ReadPreference::PrimaryOnly),
           nss.db().toString(),
           BSON("listCollections" << 1 << "filter" << BSON("name" << nss.coll())),
           Milliseconds(-1)));

       auto infos = infosRes.docs;
      ...

       BSONObj entry = infos.front();
       BSONObjBuilder donorOptionsBob;

       if (entry["options"].isABSONObj()) {
           donorOptionsBob.appendElements(entry["options"].Obj());
      }

       BSONObj info;
       if (entry["info"].isABSONObj()) {
           info = entry["info"].Obj();
      }

       uassert(ErrorCodes::InvalidUUID,
               str::stream() << "The donor shard did not return a UUID for collection " <<nss.ns()
                             << " as part of its listCollections response: "
                             << entry
                             << ", but this node expects to see a UUID.",
               !info["uuid"].eoo());

       donorOptionsBob.append(info["uuid"]);
       donorOptions = donorOptionsBob.obj();
  }
然后,cloneCollection会先获取DB的排它锁,防止创建操作完成之前收到操作该集合的命令。创建之前会检查该集合是否存在,如果存在的话,会比较存在的集合的uuid和从主分片获取的该集合的uuid,如果不一样则说明之前创建过同名的集合且存在残留数据,需要先清除后才能再次创建该集合。如果该集合不存在,会根据从主获取的集合参数信息和索引信息创建集合以及全部索引。
{
       AutoGetOrCreateDb autoCreateDb(opCtx, nss.db(), MODE_X);
       uassert(ErrorCodes::NotMaster,
               str::stream() << "Unable to create collection " << nss.ns()
                             << " because the node is not primary",
               repl::ReplicationCoordinator::get(opCtx)->canAcceptWritesFor(opCtx, nss));

       Database* const db = autoCreateDb.getDb();

   // 尝试获取collection
       Collection* collection = db->getCollection(opCtx, nss);
       if (collection) { // 存在collection
           // 集合存在,检查uuid
          ...

           uassert(ErrorCodes::InvalidUUID,
                   str::stream()
                       << "Cannot create collection "
                       << nss.ns()
                       << " because we already have an identically named collection with UUID "
                       << (collection->uuid() ? collection->uuid()->toString() : "(none)")
                       << ", which differs from the donor's UUID "
                       << (donorUUID ? donorUUID->toString() : "(none)")
                       << ". Manually drop the collection on this shard if it contains data from "
                          "a previous incarnation of "
                       << nss.ns(),
                   collection->uuid() == donorUUID);
      } else { // 不存在collection
           // We do not have a collection by this name. Create the collection with the donor's options.
           WriteUnitOfWork wuow(opCtx);
           CollectionOptions collectionOptions;
           uassertStatusOK(collectionOptions.parse(donorOptions,
                                                   CollectionOptions::ParseKind::parseForStorage));
           const bool createDefaultIndexes = true;

           uassertStatusOK(Database::userCreateNS(
               opCtx, db, nss.ns(), collectionOptions, createDefaultIndexes, donorIdIndexSpec));
           wuow.commit();

           collection = db->getCollection(opCtx, nss);
      }

       MultiIndexBlock indexer(opCtx, collection);
       indexer.removeExistingIndexes(&donorIndexSpecs);

       if (!donorIndexSpecs.empty()) {
          ...

           auto indexInfoObjs = indexer.init(donorIndexSpecs);
           uassert(ErrorCodes::CannotCreateIndex,
                   str::stream() << "failed to create index before migrating data. "
                                 << " error: "
                                 << redact(indexInfoObjs.getStatus()),
                   indexInfoObjs.isOK());

           WriteUnitOfWork wunit(opCtx);
           indexer.commit();

           for (auto&& infoObj : indexInfoObjs.getValue()) {
               // make sure to create index on secondaries as well
               serviceContext->getOpObserver()->onCreateIndex(
                   opCtx, collection->ns(), collection->uuid(), infoObj, true /* fromMigrate */);
          }

           wunit.commit();
      }
}
实际使用中,用户很可能在一个DB中创建多个分片表,很可能需要多次来获取DB的排它锁。在个人测试集群中,也发现clone操作是shardCollection操作的一个主要耗时部分。
最后,调用forceShardFilteringMetadataRefresh命令更新该分片上的该集合路由版本信息。
三、问题归纳
3.1 超时问题
通过第二部分源码分析并结合,shardCollection比较耗时的地方有以下几个:1.获取分布式锁2.其他分片clone collection3.其他分片_flushRoutingTableCacheUpdates
从日志分析可以看出本次的问题不是获取分布式锁导致的,不过该步骤在多分片表可能耗时比较久,在运营过程中,也发现部分多分片表的集群打印”waited 11s for distributed lock xxx for shardCollection”日志。规划好分片表的chunk数量和大小,控制balance的时间和次数也是非常重要的。
其他分片clone collection是创建分片表比较耗时的操作,因为创建表需要获取该DB的排它锁,如果负载比较高,可能会耗时比较多的时间。
此次超时问题主要耗时在_flushRoutingTableCacheUpdates部分,主分片发送该命令到其他分片是串行的,如果改成并发可能会有一定的改善。该操作分为两个部分,一是创建cache.chunk.nss的路由表,二是更新其中的数据。在本次问题的日志中,发现很多条如下的日志,getMore操作很慢,发生了上千次yield,最终一条oplog都没有返回。在getMore恢复正常时,cache.chunk.nss上的创建索引也正常了,可以定位此次shardCollection耗时很长的主要原因是WT在做evict操作,导致创建索引操作一直yield,没有进行。
虽然问题最终定位和整体流程的关系不太大,但是通过这次对shardCollection命令的源码分析还是有意义的。
3.2 其它一些问题
文章开头提到的问题(1)和(2)都已经在第二部分做了详细的解答,下面来看看剩余的两个问题和另外一个问题:
3.2.1 如何设置初始chunks数量来减少balance
这里指哈希分片的初始chunk数量,哈希分片如果没有指定该值,会默认设置为分片数的2倍,每个chunk的默认大小为64MB。线上经常遇到的问题是分片表的balance影响用户的性能,大多数的解决措施是调整balance的窗口,在业务低峰期进行balance。这种方式有个很大的弊端,有时候balance操作耗时非常久,可能维护窗口期间做不完一次balance。但是这种方法还是最常用的。除了这种方法,从源头上减少balance也是很有必要的,这就跟设置初始chunks数量有很大的关系。
balance首先是发生的chunk的分裂,然后各分片chunk数量差得到阈值,然后触发。那减少chunk的分裂和迁移就能够减少balance的次数和带来的不利影响。在对业务本身有一定了解之后,能够知道用户的一个分片表大概能够有多少个chunks。加上业务一般都是采用按天划分分片表的方式,那么在新创建新分片表就有可操作的空间了。
在创建分片表时,根据业务实际的规模大小,采用多chunks数量和大chunk size,尽可能减少chunk的分裂和迁移。shardCollection操作因为避免元数据冲突而提高效率,业务本身也能避免balance带来的性能影响。
3.2.2 分片路由信息
分片表的信息会同时存在于各分片中和config server中,其中都存储在config库中。各分片存储的路由信息有3个地方:
- config.cache.databases包含shard的DB信息,_id标识DB名,partitioned指出是否分片,primary指定主分片,version包含版本信息
- config.cache.collections包含shard的集合信息,id表示集合名,key指定分片键,其他字段指定版本信息config.cache.chunks.DB名.集合名包含路由信息,集合名指定分片的集合名,id和max指定chunk的键范围,shard指定分片信息
- config.cache.chunks.DB名.集合名包含路由信息,集合名指定分片的集合名,_id和max指定chunk的键范围,shard指定分片信息
config server中,存储分片信息的都在config库中,各集合如下:
- databases是分片中config.cache.databases的中心版本,各分片会定期从config server获取databases中的信息来比较更新config.cache.databases。
- collections是分片中config.cache.collections的中心版本,各分片会定期从config server获取collections中的信息来比较更新config.cache.collections。
- chunks是分片中config.cache.chunks.的中心版本,各分片会定期从config server获取collections中的信息来比较更新config.cache.chunks.。config server中的chunks中文档多一个ns字段来标记该文档描述的是哪一个具体的集合。
- locks
// locks文档存储的是最后一次拉取某ns的分布式锁的记录
{
       "_id" : "records", // 标记加锁的ns,ns可能是db,也可能是collection
       "state" : 0, // 2表示加锁,1已经被废弃
       "process" : "ConfigServer",
       "ts" : ObjectId("5f82cf26410ff005943046cc"),
       "when" : ISODate("2020-10-11T09:23:50.898Z"),
       "who" : "ConfigServer:conn3", // 哪一个session获取该锁
       "why" : "shardCollection" // 操作名
}
3.2.3 打印日志“Refresh for collection records.people5 took 4 ms and found the collection is not sharded”是否正常
在运营线上mongodb分片集群时,发现某个集群执行shardCollection命令后,某分片主节点打印”Refresh for collection records.people5 took 4 ms and found the collection is not sharded”日志,怀疑shardCollection命令是不是执行异常。从日志看,打印此日志后,会紧跟日志”CMD: drop config.cache.chunks.records.people5″。过若干时间后,该节点创建cache.chunks.records.people5集合,然后整个shardCollection执行成功。
通过第二节对mongodb shardCollection的源码分析后,我们再来看这个问题,可以断定在日志打印于该db的非主分片上的主节点上,发生的时期在从主分片clone collection后做forceShardFilteringMetadataRefresh时,由于这时主分片还在等待其他分片节点的clone collection操作完成,config server还没有记录该集合的分片路由信息,这就导致了发生于其他分片在从config server更新路由版本信息时认为该集合不是分片集合,输出该日志信息。之后所有分片集合创建完成,且主分片向config server写入该集合分片路由信息后,会调用_flushRoutingTableCacheUpdates再次创建config.cache.chunks.records.people5集合并更新路由信息。
因此,打印该日志为正常情况。不过如果该集合是该db创建的第一个集合时,因为db的路由信息在config server的config.databases中尚不存在,流程走不到检查该集合是否sharded的逻辑,不会出现该日志。
四、总结
本文通过对一个超时问题的定位,对shardCollection命令进行了源码级的分析。该命令mongos转发到config server执行,config server只做基础的参数检查,然后下发到该db的主分片进行真正的shardCollection。主分片会发送clone集合的命令给其他分片,通知其他分片从主分片同步该集合的信息。所有分片创建完成后,主分片会更新config server中的该集合的路由信息。更新完成后通知其他所有分片刷新路由信息并标记该集合为sharded。其中,其他分片clone collection和flushRoutingTableCacheUpdates两个操作是其中最为耗时的两部分。
本文还探讨了”如何设置初始chunks数量来减少balance”等其他一些问题,加深对shardCollection命令的理解,提出了一些使用建议。希望读者能够有所收获。
五、参考文献
https://github.com/mongodb/mongo/tree/master
https://docs.mongodb.com/manual/reference/
https://docs.mongodb.com/manual/core/sharded-cluster-shards/#primary-shard
作者:腾讯CMongo团队


MongoDB中文手册翻译正在进行中,欢迎更多朋友在自己的空闲时间学习并进行文档翻译,您的翻译将由社区专家进行审阅,并拥有署名权更新到中文用户手册和发布到社区微信内容平台。点击下方图片即可领取翻译任务——
更多问题可以添加社区助理小芒果微信(mongoingcom)咨询,进入社区微信交流群请备注“mongo”。
点击阅读原文
 MongoDB中文社区


评论前必须登录!
注册